Mastering Object-Oriented Programming in C++: A Comprehensive Guide
Exploring OOP Concepts, Memory Management, and Advanced Language Features

Introduction to Object-Oriented Programming (OOP) in C++
Object-Oriented Programming (OOP) is a programming paradigm that organizes code into objects, which encapsulate data and behavior. C++ is a powerful programming language that supports OOP concepts, making it an ideal choice for developing complex software systems.
Unleashing the Power of C++: Dive into the Intricacies of OOP Concepts and Advanced Features. Brace yourself for an epic journey through the realms of C++, where we delve deep into core OOP principles and unravel the mysteries of padding, greedy alignment, and other fascinating intricacies. This blog is not for the faint of heart, as we embark on a lengthy exploration of C++'s vast capabilities.
Classes and Objects
Classes and objects are the fundamental concepts of object-oriented programming in C++. A class is a blueprint that defines the data and behavior of a type of object. An object is an instance of a class that has its own state and can access the methods defined by the class.
To define a class, we use the keyword class followed by the name of the class and a pair of curly braces that enclose the data members and member functions of the class. For example:
class Rectangle {
  // data members
  private:
    int length;
    int width;

  // member functions
  public:
    // constructor
    Rectangle(int l, int w) {
      length = l;
      width = w;
    }

    // getter methods
    int getLength() {
      return length;
    }

    int getWidth() {
      return width;
    }

    // other methods
    int area() {
      return length * width;
    }

    int perimeter() {
      return 2 * (length + width);
    }
};
To create an object of a class, we use the class name followed by the name of the object and optionally some arguments to initialize the data members. For example:
Rectangle r1(10, 5); // create an object r1 of class Rectangle with length 10 and width 5
To access the data members and member functions of an object, we use the dot operator (.) followed by the name of the member. For example:
int a = r1.area(); // call the area method of r1 and assign the result to a
int p = r1.perimeter(); // call the perimeter method of r1 and assign the result to p
Classes and objects are powerful tools to create modular, reusable, and abstract code in C++.
Constructors and Destructors
One of the most important features of object-oriented programming in C++ is the concept of constructors and destructors. Constructors and destructors are special member functions that are automatically invoked when an object is created or destroyed. They are used to initialize and finalize the state of an object, as well as to manage the resources that the object may use.
Constructors
A constructor is a member function that has the same name as the class, and can take parameters to initialize the data members of the object. A constructor can be declared as public, private, or protected, depending on the access level that is desired for the object creation. A constructor can also be overloaded, meaning that there can be more than one constructor with different parameters for the same class. A constructor can also be defined as default, copy, or move, depending on how the object is initialized.
A default constructor is a constructor that takes no parameters, and is used to create an object with default values for its data members. A default constructor can be explicitly defined by the programmer, or implicitly generated by the compiler if no other constructors are defined. For example, the following class has a default constructor that sets the value of x to 0:
class Point {
public:
int x;
Point() { // default constructor
x = 0;
}
};
A copy constructor is a constructor that takes a reference to an object of the same class as a parameter, and is used to create a copy of that object. A copy constructor can be explicitly defined by the programmer, or implicitly generated by the compiler if no other constructors are defined. For example, the following class has a copy constructor that copies the value of x from another Point object:
class Point {
public:
int x;
Point(const Point& p) { // copy constructor
x = p.x;
}
};
A move constructor is a constructor that takes an rvalue reference to an object of the same class as a parameter, and is used to create an object by transferring the ownership of the resources from that object. A move constructor can be explicitly defined by the programmer, or implicitly generated by the compiler if no other constructors are defined. For example, the following class has a move constructor that moves the pointer to a dynamically allocated array from another Array object
class Array {
public:
int* data;
int size;
Array(Array&& a) { // move constructor
data = a.data; // transfer ownership of data
size = a.size;
a.data = nullptr; // set source data to null
a.size = 0;
}
};
Important points to remember:
The Effect of Parameterized Constructors on the Default Constructor: When you define one or more parameterized constructors in a class, the default constructor provided by the compiler is not generated. Consequently, if you try to create an object without passing any arguments, it will result in an error. This emphasizes the need to define a default constructor explicitly if it is required.
Copy Constructor - Default Generation and Custom Implementation: By default, C++ generates a copy constructor for every class. The copy constructor is used to create a copy of an object. You can utilize the default copy constructor by simply passing the object you want to copy as an argument, like this:
Obj o1(o2);.
However, you can also create your own copy constructor if you have specific requirements or need to perform additional operations during the copying process. It is important to pass the object by reference in the copy constructor to prevent infinite recursion. Without using the '&' to pass by reference, the copy constructor will be invoked repeatedly, resulting in an infinite loop.
Shallow Copy in the Default Copy Constructor: The default copy constructor performs a shallow copy, which means it copies the values of all the member variables. However, if a member variable is a pointer or an array, it only copies the address, resulting in both objects pointing to the same memory location. This can lead to unintended side effects when modifying the copied object.
Copy Constructor and Deep Copy: To avoid the issues associated with shallow copy, it is important to create a deep copy when dealing with dynamically allocated memory or arrays. You can manually implement a copy constructor to achieve a deep copy using techniques like
strcpyto copy strings or dynamically allocating memory and copying the contents.
For example:
arduinoCopy codeHero(Hero &temp) {
    char *ch = new char[strlen(temp.name) + 1];
    strcpy(ch, temp.name);
    this->name = ch;
    this->health = temp.health;
    this->level = temp.level;
}
In the above example, the copy constructor allocates new memory for the name string and performs a deep copy to avoid shared memory between objects.
Copy Assignment Operator (=): The copy assignment operator (=) is another important concept related to copying objects. It allows you to assign the values of one object to another after both objects are already created. It performs member-wise assignment, copying each member variable from the source object to the target object.
Destructors
A destructor is a member function that has the same name as the class, preceded by a tilde (~), and takes no parameters. A destructor is used to perform any cleanup operations before an object is destroyed, such as releasing memory or closing files. A destructor can be declared as public, private, or protected, depending on the access level that is desired for the object destruction. A destructor can also be defined as default or virtual, depending on how the object is inherited.
A default destructor is a destructor that performs no specific actions, and is used to destroy an object with default behavior. A default destructor can be explicitly defined by the programmer, or implicitly generated by the compiler if no other destructors are defined. For example, the following class has a default destructor that does nothing:
class Point {
public:
int x;
~Point() { // default destructor
// do nothing
}
};
A virtual destructor is a destructor that is declared with the virtual keyword, and is used to destroy an object with polymorphic behavior. A virtual destructor ensures that the correct destructor is called when an object of a derived class is deleted through a pointer to a base class. A virtual destructor can only be explicitly defined by the programmer. For example, the following class has a virtual destructor that prints a message:
class Shape {
public:
virtual ~Shape() { // virtual destructor
std::cout << "Shape destroyed" << std::endl;
}
};
this, static, const keywords
this keyword
One of the features of C++ is the this keyword, which refers to the current object in a member function or constructor.
The this keyword can be used to access the data members and member functions of the current object, as well as to pass the current object as an argument to another function. For example, consider the following class definition:
class smth {
int x;
smth(int x) {
this->x = x; // assign the parameter x to the data member x
}
void show() {
cout << "x = " << this->x << endl; // print the value of x
}
};
In this class, the constructor and the show() function use the this keyword to access the data member x of the current object. The this keyword is also a pointer, which means it stores the address of the current object in memory. Therefore, we can print the value of this and compare it with the address of an object of this class. For example:
int main() {
smth ramesh(10); // create an object ramesh with x = 10
cout << "Address of ramesh: " << &ramesh << endl; // print the address of ramesh
cout << "Value of this in constructor: " << ramesh.this << endl; // print the value of this in constructor
ramesh.show(); // call the show() function
return 0;
}
The output of this program will be something like:
Address of ramesh: 0x7fffbf5f9a1c
Value of this in constructor: 0x7fffbf5f9a1c
x = 10
As we can see, the value of this and the address of ramesh are the same, which confirms that this points to the current object.
The this keyword can also be used to pass the current object as an argument to another function. For example, suppose we have another class called something, which has a function called compare() that takes an object of smth as a parameter and compares its x value with its own data member y. We can write something like this:
class something {
int y;
public:
something(int y) {
this->y = y;
}
void compare(smth obj) {
if (this->y > obj.x) {
cout << "y is greater than x" << endl;
}
else if (this->y < obj.x) {
cout << "y is less than x" << endl;
}
else {
cout << "y is equal to x" << endl;
}
}
};
Then, in the main function, we can create an object of something and pass an object of smth to its compare() function using the this keyword. For example:
int main() {
smth ramesh(10);
something suresh(20);
suresh.compare(ramesh); // pass ramesh as an argument
ramesh.compare(*this); // pass the current object (main) as an argument
return 0;
}
The output of this program will be something like:
y is greater than x
Error: 'this' may only be used inside a nonstatic member function
The first line is the result of comparing suresh and ramesh, where suresh's y is greater than ramesh's x. The second line is an error message, because we cannot use this outside a member function or constructor. The main function is not a member function of any class, so it does not have a this pointer.
The this keyword in C++ is a useful feature that allows us to access and manipulate the current object in various ways. It can help us avoid naming conflicts, improve readability, and enable polymorphism.
const keyword
The const keyword is a fundamental feature in C++ that allows programmers to enforce immutability, prevent accidental modifications, and optimize code based on constness. In this part, we will explore the various use cases of the const keyword, including its application with pointers, objects, functions, parameters, and return types.
constwith Pointers:Using
constwith pointers allows for different levels of immutability and flexibility.A pointer to a constant object (
const int* ptr) means the object's value cannot be modified through the pointer, but the pointer itself can be reassigned to a different memory address.A constant pointer to an object (
int* const ptr) ensures that the pointer always points to the same address, but the value at that address can be modified.Combining both forms creates a constant pointer to a constant object (
const int* const ptr), where neither the pointer nor the value it points to can be modified.
const int* ptr;                  // Pointer to a constant integer
int* const ptr;                  // Constant pointer to an integer
const int* const ptr;            // Constant pointer to a constant integer
constwith Objects:When
constis applied to an object, it signifies that the object itself is treated as constant, and its member variables cannot be modified.Member functions declared as
constindicate that they do not modify the object's internal state (unless marked asmutable).
class MyClass {
public:
    void doSomething() const;     // Const member function
};
constFunctions, Parameters, and Return Types:constfunctions do not modify the object on which they are called, allowing them to be safely invoked on constant objects.Using
constwith function parameters guarantees that the function will not modify the value of the parameter.constreturn types indicate that the returned value is constant and should not be modified by the caller.
class MyClass {
public:
    int getValue() const;         // Const member function
};

void printValue(const int x);     // Const parameter

const int getConstantValue();     // Const return type
Error on Passing
constArguments to Non-const Parameters:- Passing a
constargument to a non-const parameter of a function results in a compile-time error. This enforcement ensures that non-const parameters cannot modify the providedconstvalues.
- Passing a
void modifyValue(int* ptr);       // Non-const parameter

int value = 5;
const int constantValue = 10;

modifyValue(&value);              // Valid, passing a non-const argument
modifyValue(&constantValue);      // Error, passing a const argument to a non-const parameter
Additional Considerations:
constcan also be used with fundamental data types, user-defined types, and arrays.constmember functions can be called on bothconstand non-const objects.mutablekeyword allows modifying a member variable even within aconstmember function.const_castcan be used to remove theconstqualifier and enable modifications in certain scenarios.constexpris a related keyword that indicates that an expression can be evaluated at compile time.
Conclusion: The const keyword in C++ is a powerful tool for enforcing immutability and preventing accidental modifications. By utilizing const with pointers, objects, functions, parameters, and return types, you can create more robust
and maintainable code. Understanding and applying const correctly not only helps express your intent but also allows the compiler to optimize the code based on constness. Embrace the const keyword as a valuable ally in your journey to write safer and more reliable C++ code.
static keyword
The static keyword in C++ is used to declare variables and functions that belong to the class, not to any specific object of the class. This means that they can be accessed without creating an object of the class, using the class name and the scope resolution operator (::).
For example, to declare a static variable called TimeToComplete in a class called Hero, we can write:
class Hero {
public:
static int TimeToComplete; // declaration
};

int Hero::TimeToComplete = 1; // initialization
To access the static variable, we can use the class name and the scope resolution operator, like this:
cout << Hero::TimeToComplete; // output: 1
We can also use an object of the class to access the static variable, like this:
Hero h;
cout << h.TimeToComplete; // output: 1
However, this is not recommended, as it may cause confusion and imply that the variable belongs to the object, not to the class.
Static functions are similar to static variables, in that they belong to the class and can be accessed without creating an object of the class. However, static functions have some limitations:
They cannot use the this keyword, as there is no current object to refer to.
They can only access static variables and functions of the class, not the normal data members or member functions.
For example, to declare a static function called printTime in the Hero class, we can write:
class Hero {
public:
static int TimeToComplete;
static void printTime(); // declaration
};

void Hero::printTime() { // definition
cout << "Time to complete: " << TimeToComplete << endl;
}
To call the static function, we can use the class name and the scope resolution operator, like this:
Hero::printTime(); // output: Time to complete: 1
We can also use an object of the class to call the static function, like this:
Hero h;
h.printTime(); // output: Time to complete: 1
However, this is also not recommended, as it may cause confusion and imply that the function belongs to the object, not to the class.
Static variables and functions are useful when we want to share some data or behavior among all objects of a class, without wasting memory or creating unnecessary dependencies. They can also be used to implement some advanced concepts in C++, such as singletons, constants, or utility functions.
Four pillars of OOPs
Encapsulation
Encapsulation is one of the fundamental concepts of object-oriented programming. It refers to the wrapping up of data members and functions into a single unit called a class. In this part, we will learn what encapsulation is, how to achieve it in C++, and what are its advantages and applications.
To understand encapsulation, let us first look at an example of a fully encapsulated class in C++.
//A fully encapsulated class

class Student {
private: // data members
    int rollNo; string name; float marks;

public: // member functions
    void setRollNo(int r) { rollNo = r; }

    void setName(string n) { name = n; }

    void setMarks(float m) { marks = m; }

    int getRollNo() { return rollNo; }

    string getName() { return name; }

    float getMarks() { return marks; }
};
In the above code, we have defined a class Student that has three data members: rollNo, name, and marks. These data members are declared as private, which means they can only be accessed by the member functions of the class. The member functions are declared as public, which means they can be accessed by any other function or object outside the class. The member functions are also called setters and getters, as they are used to set and get the values of the data members.
The main idea behind encapsulation is to hide the implementation details of a class from the outside world. This way, we can achieve data hiding and increase the security of our data. For example, if we want to make the class read-only, we can simply remove the setter functions and only keep the getter functions. This will prevent any external function or object from modifying the data members of the class.
Another advantage of encapsulation is that it enables code reuse. We can create multiple objects of the same class and use them for different purposes. For example, we can create an array of Student objects and store the details of different students in it. We can also use inheritance and polymorphism to create subclasses and override the member functions of the base class.
One more benefit of encapsulation is that it facilitates unit testing. Unit testing is a process of testing individual units or components of a software system. By encapsulating our data and functions into classes, we can easily test them separately without affecting other parts of the system.
To summarize, encapsulation is a technique of hiding the internal details of a class from the outside world. It helps us to achieve data hiding, security, code reuse, and unit testing. In C++, we can achieve encapsulation by using access specifiers (private, public, protected) to control the visibility of data members and member functions.
Inheritance
Inheritance is a way of creating new classes from existing ones, by reusing their data and behavior. Inheritance allows us to write more modular and reusable code, and to model the relationships between different types of objects.
The class that inherits from another class is called a subclass, child class, or derived class. The class that is used to inherit from is called a parent class, superclass, or base class. For example, if we have a class called Animal that defines some common attributes and methods for all animals, we can create subclasses like Dog, Cat, or Bird that inherit from Animal and add their own specific features.
To declare a subclass in C++, we use the colon (:) followed by an access modifier (public, protected, or private) and the name of the base class. For example:
class Dog: public Animal {
// Dog-specific data and methods
};
This means that Dog is a subclass of Animal and inherits all its public and protected members. The access modifier determines how the inherited members are accessible in the subclass. If we use public inheritance, the public members of the base class remain public in the subclass, and the protected members remain protected. If we use protected inheritance, the public and protected members of the base class become protected in the subclass. If we use private inheritance, the public and protected members of the base class become private in the subclass.
We can also inherit from more than one base class using multiple inheritance. For example:
class Bird: public Animal, public Flying {
// Bird-specific data and methods
};
This means that Bird is a subclass of both Animal and Flying, and inherits all their public and protected members. Multiple inheritance allows us to combine features from different classes into one subclass.
However, multiple inheritance can also cause some problems, such as inheritance ambiguity. This happens when two or more base classes have members with the same name and signature, and the subclass tries to access them without specifying which one to use. For example:
class A {
public:
void func() {
cout << "A::func()" << endl;
}
};

class B {
public:
void func() {
cout << "B::func()" << endl;
}
};

class C: public A, public B {
// C-specific data and methods
};

int main() {
C obj;
obj.func(); // error: ambiguous call to func()
}
In this case, the compiler does not know whether to call A::func() or B::func(), because both are inherited by C. To resolve this ambiguity, we need to use the scope resolution operator (::) to specify which base class member we want to access. For example:
int main() {
C obj;
obj.A::func(); // OK: calls A::func()
obj.B::func(); // OK: calls B::func()
}
There are different types of inheritance based on how many subclasses and base classes are involved. Some of the common types are:
- Single inheritance: one subclass inherits from one base class.
- Multiple inheritance: one subclass inherits from two or more base classes.
- Hierarchical inheritance: one base class serves as a parent for more than one subclass.
- Multilevel inheritance: a subclass inherits from another subclass that inherits from another subclass, and so on.
- Hybrid inheritance: a combination of two or more types of inheritance.
The following table shows access modifiers and modes in inheritance:

The following diagram shows different types of inheritance:
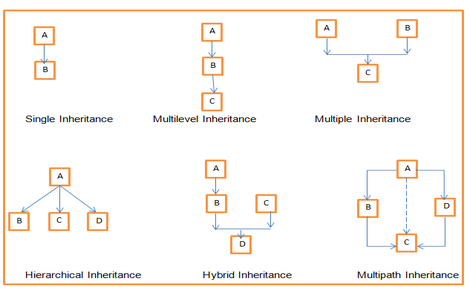
Inheritance is a powerful feature of C++ that allows us to create new classes from existing ones, by reusing their data and behavior. Inheritance also helps us to model the relationships between different types of objects and to write more modular and reusable code. However, inheritance can also introduce some complexity and ambiguity, so we need to be careful when using it and follow some good practices and principles.
Polymorphism
Polymorphism is a Greek word that means "many forms". It is one of the key features of object-oriented programming that allows us to use the same name for different behaviors or actions. For example, we can use the same function name to perform different tasks depending on the arguments or the object type.
There are two main types of polymorphism in C++: compile-time polymorphism and run-time polymorphism. Let's see what they are and how they work.
Compile-time polymorphism
Compile-time polymorphism, also known as static polymorphism, is when the compiler determines which function or operator to call at compile time, based on the type and number of arguments. There are two ways to achieve compile-time polymorphism in C++: function overloading and operator overloading.
Function overloading
Function overloading is when we define multiple functions with the same name but different parameters. The compiler will choose the most appropriate function to call based on the arguments passed to it. For example, we can define a function called add that can add two integers, two doubles, or two strings.
#include <iostream>
#include <string>
using namespace std;

// Function to add two integers
int add(int a, int b) {
return a + b;
}

// Function to add two doubles
double add(double a, double b) {
return a + b;
}

// Function to add two strings
string add(string a, string b) {
return a + b;
}

int main() {
cout << add(10, 20) << endl; // calls int add(int, int)
cout << add(3.14, 2.71) << endl; // calls double add(double, double)
cout << add("Hello", "World") << endl; // calls string add(string, string)
return 0;
}
The output of this program:
30
5.85
HelloWorld
Note that changing the return type of a function does not overload it and would give an error. The input arguments should change in order to achieve function overloading. We can change:
- The number of arguments
- The type of arguments
- The sequence of arguments
We can also achieve function overloading by using default arguments, which allow us to omit some parameters when calling a function. For example, we can define a function called print that can print one or two strings with a separator.
#include <iostream>
#include <string>
using namespace std;

// Function to print one or two strings with a separator
void print(string s1, string s2 = "", string sep = " ") {
cout << s1 << sep << s2 << endl;
}

int main() {
print("Hello"); // calls print(string)
print("Hello", "World"); // calls print(string, string)
print("Hello", "World", "-"); // calls print(string, string, string)
return 0;
}
The output of this program is:
Hello
Hello World
Hello-World
How does function overloading work?
The compiler follows these steps to resolve which function to call:
- Exact match: The compiler looks for a function that matches the name and the parameters exactly.
- Promotion: If no exact match is found, the compiler tries to convert some data types to higher ones. For example, char, unsigned char, and short are promoted to int; float is promoted to double.
- Standard conversion: If no promotion is possible, the compiler tries to find a match through the standard conversion rules. For example, int can be converted to double; double can be converted to bool.
- Error: If none of the above steps work, the compiler reports an error.
Operator overloading
Operator overloading is when we define how an operator works for a user-defined data type, such as a class or a struct. For example, we can define how the + operator works for a complex number class.
#include <iostream>
using namespace std;

// A class to represent complex numbers
class Complex {
public:
// Constructor to initialize real and imaginary parts
Complex(double r = 0.0, double i = 0.0) : real(r), imag(i) {}

// A method to display complex numbers
void show() {
cout << real << " + " << imag << "i" << endl;
}

// An overloaded + operator to add two complex numbers
Complex operator+(const Complex& c) {
return Complex(real + c.real, imag + c.imag);
}

private:
// Data members to store real and imaginary parts
double real;
double imag;
};

int main() {
// Create two complex numbers
Complex c1(1.0, 2.0);
Complex c2(3.0, 4.0);

// Add them using the overloaded + operator
Complex c3 = c1 + c2;

// Display the result
c3.show();

return 0;
}
The output of this program is:
4+6i
We can overload:
- Unary operators: Operators that take one operand, such as -, !, ++, --, etc.
- Binary operators: Operators that take two operands, such as +, -, *, /, etc.
- Special operators: Operators that have special syntax, such as [], (), ->, etc.
Almost all operators can be overloaded except a few. Following is the list of operators that cannot be overloaded:
- sizeof: Returns the size of an object in bytes.
- typeid: Returns the type information of an object.
- Scope resolution (::): Used to access global variables or class members.
- Class member access (., .*): Used to access data members or member functions of an object or a pointer to an object.
- Ternary or conditional (?:): Returns one of two values based on a condition.
The syntax for operator overloading is:
return-type operator<op> (params) {
// body
}
where return-type is the type of the value returned by the operator, op is the operator to be overloaded, and params are the parameters required by the operator.
Note that the first operand of a binary operator is pointed by the this pointer and the second operand is the input argument. For example, in a + b, if a is an object of a class, then this points to a and b is the input argument.
While most operators follow a specific syntax for overloading, there are a few special operators that have unique syntax. These special operators include new, delete, [], and more.
Example: Overloading the new operator
The new operator is used to allocate memory for an object dynamically. We can overload the new operator to customize how memory allocation works for a class. For example, we can keep track of how many objects are created using the new operator.
#include <iostream>
using namespace std;

// A class to represent points
class Point {
public:
// Constructor to initialize x and y coordinates
Point(int x = 0, int y = 0) : x(x), y(y) {}

// A method to display point coordinates
void show() {
cout << "(" << x << ", " << y << ")" << endl;
}

// An overloaded new operator to allocate memory and count objects
void* operator new(size_t size) {
cout << "Allocating memory for a point object" << endl;
void* p = malloc(size); // allocate memory using malloc
if (!p) {
bad_alloc ba; // create a bad_alloc exception object
throw ba; // throw the exception
}
count++; // increment the object count
return p; // return the pointer to memory
}

// A static method to return the object count
static int getCount() {
return count;
}

private:
// Data members to store x and y coordinates
int x;
int y;

// A static data member to store the object count
static int count;
};

// Initialize the static data member
int Point::count = 0;

int main() {
try {
// Create three point objects using the new operator
Point* p1 = new Point(1, 2);
Point* p2 = new Point(3, 4);
Point* p3 = new Point(5, 6);

// Display the point coordinates
p1->show();
p2->show();
p3->show();

// Display the object count
cout << "Number of point objects: " << Point::getCount() << endl;

// Delete the point objects using the delete operator
delete p1;
delete p2;
delete p3;

} catch (bad_alloc& ba) {
// Handle the exception
cout << "Memory allocation failed: " << ba.what() << endl;
}


}
The output of this program is:
Allocating memory for a point object
Allocating memory for a point object
Allocating memory for a point object
(1, 2)
(3, 4)
(5, 6)
Number of point objects: 3
There are many operators which can be overloaded with different syntax.. check them out.
Runtime Polymorphism and Virtual functions
Runtime polymorphism is a feature of object-oriented programming that allows us to use the same name for different methods or functions that have different implementations. This way, we can use the same code to perform different actions depending on the type of object we are dealing with. For example, we can have a generic Animal class that has a method called speak, and then we can have different subclasses of Animal, such as Dog, Cat, and Bird, that override the speak method to make different sounds.
Runtime polymorphism is also known as dynamic polymorphism or method overriding. It is possible only through inheritance, which is another feature of object-oriented programming that allows us to create new classes from existing ones by adding or modifying some features. Inheritance creates a hierarchical relationship between classes, where the new class is called the derived class or the child class, and the existing class is called the base class or the parent class. The derived class inherits all the features of the base class, but can also have its own features or modify some of the inherited ones.
To achieve runtime polymorphism in C++, we need to use a special type of function called a virtual function. A virtual function is a member function that is declared in the base class using the keyword virtual and is re-defined (overridden) in the derived class. When we call a virtual function using a pointer or a reference to the base class, the compiler will determine at runtime which version of the function to execute based on the actual type of the object pointed or referred by the pointer or reference. This is also known as late binding or dynamic binding.
Let's see an example of how to use virtual functions in C++. First, we will define a base class called Animal that has a virtual function called speak:
// Base class
class Animal {
public:
// Virtual function
virtual void speak() {
cout << "Animal speaks" << endl;
}
};
Next, we will define three derived classes called Dog, Cat, and Bird that inherit from Animal and override the speak function:
// Derived class 1
class Dog : public Animal {
public:
// Override virtual function
void speak() override {
cout << "Dog barks" << endl;
}
};

// Derived class 2
class Cat : public Animal {
public:
// Override virtual function
void speak() override {
cout << "Cat meows" << endl;
}
};

// Derived class 3
class Bird : public Animal {
public:
// Override virtual function
void speak() override {
cout << "Bird chirps" << endl;
}
};
Now, we can create objects of these classes and use pointers or references to the base class to call the speak function:
int main() {
// Create objects of derived classes
Dog d;
Cat c;
Bird b;

// Create pointers to base class
Animal* p1 = &d;
Animal* p2 = &c;
Animal* p3 = &b;

// Call virtual function using pointers
p1->speak(); // Dog barks
p2->speak(); // Cat meows
p3->speak(); // Bird chirps

// Create references to base class
Animal& r1 = d;
Animal& r2 = c;
Animal& r3 = b;

// Call virtual function using references
r1.speak(); // Dog barks
r2.speak(); // Cat meows
r3.speak(); // Bird chirps

return 0;
}
As we can see, the output depends on the actual type of the object that is pointed or referred by the pointer or reference, not on the type of the pointer or reference itself. This is how runtime polymorphism works in C++.
Some key points to remember about virtual functions are:
- Virtual functions are dynamic in nature.
- They are defined by inserting the keyword "virtual" inside a base class and are always declared with a base class and overridden in a child class.
- A virtual function is called during runtime.
- The override specifier is optional but recommended to use when overriding a virtual function in a derived class. It helps to avoid errors and improve readability.
- The final specifier can be used to prevent further overriding of a virtual function in any subclass. It helps to enforce design constraints and improve performance.
- A pure virtual function is a virtual function that has no definition in the base class and is declared with an equal sign followed by zero (=0). It makes the base class abstract, meaning that it cannot be instantiated. A pure virtual function must be overridden in a derived class, otherwise the derived class will also be abstract.
- A class that has at least one pure virtual function is called an abstract class. An abstract class can have other non-pure virtual functions or normal functions as well.
- A class that inherits from an abstract class and overrides all the pure virtual functions is called a concrete class. A concrete class can be instantiated and used normally.
Abstraction
Abstraction is the process of hiding the details of how something works and only showing the essential features that are relevant to the user. Abstraction allows you to focus on what something does rather than how it does it. Abstraction also makes your code more reusable, maintainable, and secure.
One way to achieve abstraction in C++ is through classes. By using access modifiers, you can hide the implementation details of a class and only expose the interface that other parts of the code can use. This is called implementation hiding.
For example, suppose you want to create a class that represents a bank account. You might have some data members, such as balance, interest rate, and account number, and some member functions, such as deposit, withdraw, and transfer. You don't want other parts of the code to access or modify the data members directly, because that might cause errors or security issues. Instead, you want to provide some public member functions that define how the data members can be accessed or modified. These public member functions are the interface of the class, and they are the only way to interact with an object of the class. The data members and any private or protected member functions are hidden from the outside world, and they are the implementation of the class.
Here is an example of how you might define a bank account class in C++:
class BankAccount {
private:
// data members
double balance;
double interestRate;
int accountNumber;

// private member functions
void updateBalance(); // updates balance based on interest rate
bool validateAccount(int number); // checks if account number is valid

public:
// constructor
BankAccount(double initialBalance, double rate, int number);

// public member functions
void deposit(double amount); // adds amount to balance
void withdraw(double amount); // subtracts amount from balance
void transfer(double amount, BankAccount& other); // transfers amount from this account to another account
double getBalance(); // returns balance
int getAccountNumber(); // returns account number
};
As you can see, the class has three private data members and two private member functions that are not accessible from outside the class. The class also has a constructor and five public member functions that define how an object of the class can be created and used. These public member functions are the abstraction of the bank account concept, and they hide the details of how the balance is updated, how the account number is validated, etc.
By using abstraction, you can create objects of the BankAccount class and use them without worrying about how they work internally. For example, you can write code like this:
// create two bank accounts with different initial balances, interest rates, and account numbers
BankAccount alice(1000.0, 0.01, 123456);
BankAccount bob(500.0, 0.02, 654321);

// print their balances and account numbers
cout << "Alice's balance: " << alice.getBalance() << endl;
cout << "Alice's account number: " << alice.getAccountNumber() << endl;
cout << "Bob's balance: " << bob.getBalance() << endl;
cout << "Bob's account number: " << bob.getAccountNumber() << endl;

// transfer 100 from Alice to Bob
alice.transfer(100.0, bob);

// print their balances again
cout << "Alice's balance after transfer: " << alice.getBalance() << endl;
cout << "Bob's balance after transfer: " << bob.getBalance() << endl;
The output:
Alice's balance: 1000
Alice's account number: 123456
Bob's balance: 500
Bob's account number: 654321
Alice's balance after transfer: 900
Bob's balance after transfer: 600
As you can see, we don't need to know how the transfer function works internally or how the balance is updated based on the interest rate. We just need to know what parameters to pass and what values to expect from the public member functions.
Abstraction is not only useful for classes, but also for other concepts in C++, such as data abstraction and control abstraction. Data abstraction is when you only show the required information about the data and hide the unnecessary details. For example, when you use an array or a vector to store a collection of values, you don't need to know how the memory is allocated or how the elements are accessed. You just need to know the size, the type, and the index of the elements. Control abstraction is when you only show the required information about the implementation and hide the unnecessary details. For example, when you use a loop or a function to perform a task, you don't need to know how the loop condition is evaluated or how the function parameters are passed. You just need to know what the loop or the function does and what are the inputs and outputs.
Abstraction is a powerful technique that can help you write better code in C++. By hiding the details of how something works and only showing the essential features that are relevant to the user, you can make your code more reusable, maintainable, and secure. You can achieve abstraction in C++ through classes, data abstraction, and control abstraction.
Difference between Abstraction and Encapsulation
Abstraction and encapsulation are related but not the same, and understanding them can help you design better software.
Abstraction is the process of hiding the details of how something works and only exposing what it does. Abstraction allows you to focus on the essential features of a system and ignore the irrelevant ones.
Encapsulation is the technique of bundling data and methods that operate on that data into a single unit, called an object. Encapsulation also restricts the access to some of the object's components, making them private or protected. Encapsulation ensures that the data is consistent and secure, and that only authorized operations can be performed on it.
Abstraction and encapsulation are often confused because they both involve hiding information. However, they have different purposes and effects. Abstraction hides the implementation details of a system, while encapsulation hides the internal representation of an object. Abstraction reduces complexity and increases usability, while encapsulation increases cohesion and reduces coupling.
To illustrate the difference between abstraction and encapsulation, let's look at an example in C++:
class Shape{
public:
virtual double area() = 0; // pure virtual function
virtual double perimeter() = 0; // pure virtual function
};

class Circle: public Shape{
private:
double radius;
public:
Circle(double r): radius(r) {}

double area(){
return 3.14 * radius * radius;
}

double perimeter(){
return 2 * 3.14 * radius;
}
};

class Rectangle: public Shape{
private:
double length, width;
public:
Rectangle(double l, double w): length(l), width(w) {}

double area(){
return length * width;
}

double perimeter(){
return 2 * (length + width);
}
};
In this example, Shape is an abstract class that defines two abstract methods: area and perimeter. These methods are not implemented in Shape, but they are overridden in its subclasses: Circle and Rectangle. These subclasses also have their own private data: radius for Circle and length and width for Rectangle.
Shape is an example of abstraction because it hides the details of how different shapes calculate their area and perimeter, and only exposes a common interface for all shapes. This way, we can use any shape object without knowing its specific type or implementation.
Circle and Rectangle are examples of encapsulation because they bundle their data and methods into a single unit, and make their data private. This way, we can ensure that the data is valid and consistent, and that only the methods defined in the class can access or modify it.
Now lets move to some advanced concepts
Padding and Alignment in C++
In C++, the size of a struct or class is not simply the sum of its data members. The compiler adds padding to ensure proper alignment of the data members. Padding is necessary because many processors require that certain types of data be stored at memory addresses that are multiples of their size. This alignment requirement improves memory access performance.
In C++, a class is similar to a struct, but with additional features such as member functions and static data members. However, only non-static data members contribute to the size of the class and its objects. Static members have only one instance shared among all objects, and member functions are executable code without size.
Consider the following class as an example:
class A {
private:
    static int i;
    int a;
    char b;

public:
    A() {
        a = 0;
        b = '#';
    }
    A(int aa, char bb) {
        a = aa;
        b = bb;
    }
    int get_int() {
        cout << a << endl;
        return a;
    }
    char get_char() {
        cout << b << endl;
        return b;
    }
};
The size of the class A would be the sum of its non-static data members plus padding. The alignment of class A would be as follows:

In this case, the size of class A is 8 bytes. Static data members and member functions do not contribute to the size of the class.
Now, let's discuss how the compiler adds padding for alignment. The method of padding and alignment is compiler-dependent, but generally, the compiler aligns data members until the boundary of the maximum memory allocated. In the previous example, the maximum memory allocated is 8 bytes, so all the data members are allocated 8 bytes each, resulting in a total size of 32 bytes. However, this alignment may vary depending on the compiler and system.
The alignment is not simply the number of data members multiplied by the maximum datatype size. The compiler tries to align the data members optimally while maintaining their order.
Let's consider the size of a derived class. A derived class includes all the data members of the base class it inherits, and it may have its own data members as well. Therefore, the size of a derived class should be the size of the base class data members plus the size of the derived class data members.
Here's an example to illustrate the size of a derived class:
#include <bits/stdc++.h>
using namespace std;

class Base {
protected:
    static int i;
    int a;
    char b;

public:
    Base() {
        a = 0;
        b = '#';
    }
    Base(int aa, char bb) {
        a = aa;
        b = bb;
    }
    int get_int() {
        cout << a << endl;
        return a;
    }
    char get_char() {
        cout << b << endl;
        return b;
    }
};

class Derived : public Base {
private:
    int c;
    char d;

public:
    Derived() {
        c = 0;
        d = '#';
    }
    Derived(int cc, char dd) {
        c = cc;
        d = dd;
    }
    int get_int() {
        cout << c << endl;
        return c;
    }
    char get_char() {
        cout << d << endl;
        return d;
    }
};

int main() {
    Base b;
    Derived d;
    printf("Size of class Base: %lu\n", sizeof(Base));
    printf

("Size of object b: %lu\n", sizeof(b));
    printf("Size of class Derived: %lu\n", sizeof(Derived));
    printf("Size of object d: %lu\n", sizeof(d));
    return 0;
}
The output of this code would be:
Size of class Base: 8
Size of object b: 8
Size of class Derived: 16
Size of object d: 16
In the above example, the size of the base class object is 8 bytes, while the size of the derived class object is 16 bytes. The alignment of the base class is as follows:

The alignment of the derived class is as follows:

The order of the data members is maintained, and since the base class constructor is invoked first, the base class members come first in memory.
If we change the order of the data members in the derived class, the size of the class and object will also change accordingly. The compiler aligns the data members greedily to achieve optimal alignment while keeping the order unchanged. Here's an example:
#include <bits/stdc++.h>
using namespace std;

class Base {
protected:
    static int i;
    int a;
    char b;

public:
    Base() {
        a = 0;
        b = '#';
    }
    Base(int aa, char bb) {
        a = aa;
        b = bb;
    }
    int get_int() {
        cout << a << endl;
        return a;
    }
    char get_char() {
        cout << b << endl;
        return b;
    }
};

class Derived : public Base {
private:
    char d;
    int c;

public:
    Derived() {
        c = 0;
        d = '#';
    }
    Derived(int cc, char dd) {
        c = cc;
        d = dd;
    }
    int get_int() {
        cout << c << endl;
        return c;
    }
    char get_char() {
        cout << d << endl;
        return d;
    }
};

int main() {
    Base b;
    Derived d;
    printf("Size of class Base: %lu\n", sizeof(Base));
    printf("Size of object b: %lu\n", sizeof(b));
    printf("Size of class Derived: %lu\n", sizeof(Derived));
    printf("Size of object d: %lu\n", sizeof(d));
    return 0;
}
The output of this code would be:
Size of class Base: 8
Size of object b: 8
Size of class Derived: 12
Size of object d: 12
By changing the order of the members in the derived class, the size of the derived class object is now 12 bytes. The alignment in this case is as follows:

The derived class is better aligned due to the greedy alignment strategy employed by the compiler.
Now, let's discuss the effect of the virtual keyword on the size of a derived class. When a derived class inherits a base class as virtual, there will be an additional 8 bytes added to the size of the derived class, which corresponds to the size of the Virtual Table Pointer (VTPR).
Consider the following example:
#include <bits/stdc++.h>
using namespace std;

class Base

 {
protected:
    static int i;
    int a;
    char b;

public:
    Base() {
        a = 0;
        b = '#';
    }
    Base(int aa, char bb) {
        a = aa;
        b = bb;
    }
    int get_int() {
        cout << a << endl;
        return a;
    }
    char get_char() {
        cout << b << endl;
        return b;
    }
};

class Derived : virtual public Base {
private:
    char d;
    int c;

public:
    Derived() {
        c = 0;
        d = '#';
    }
    Derived(int cc, char dd) {
        c = cc;
        d = dd;
    }
    int get_int() {
        cout << c << endl;
        return c;
    }
    char get_char() {
        cout << d << endl;
        return d;
    }
};

int main() {
    Base b;
    Derived d;
    printf("Size of class Base: %lu\n", sizeof(Base));
    printf("Size of object b: %lu\n", sizeof(b));
    printf("Size of class Derived: %lu\n", sizeof(Derived));
    printf("Size of object d: %lu\n", sizeof(d));
    return 0;
}
The output of this code would be:
Size of class Base: 8
Size of object b: 8
Size of class Derived: 24
Size of object d: 24
In this example, we can see that by adding the virtual keyword to the inheritance of the base class, the size of the derived class increases to 24 bytes due to the inclusion of the VTPR. The alignment of the derived class is as follows:
+----------------------+
|      Base::a         |   <-- 4 bytes
+----------------------+
|      Base::b         |   <-- 1 byte
+----------------------+
|  Derived::Base::i    |   <-- 4 bytes (Virtual Table Pointer)
+----------------------+
|   Derived::c         |   <-- 4 bytes
+----------------------+
|   Derived::d         |   <-- 1 byte
+----------------------+
In this alignment, the Derived class has an additional 4 bytes for the Base::i member, which represents the Virtual Table Pointer (VTPR) due to virtual inheritance.
Finally, it's worth noting that an empty class in C++ has a size of 1 byte. This is done to ensure that different objects have different addresses, even for empty classes.
Dynamic Memory Allocation
Dynamic memory allocation is a way of allocating memory for variables or objects at run time, instead of compile time. This means that the size and type of the memory can be decided by the programmer during the execution of the program, rather than beforehand. Dynamic memory allocation is useful when the amount of memory needed is not known in advance, or when the memory requirements are too large for static allocation.
Note: stack memory is used for automatic (static) and local variables, while heap memory is used for dynamic memory allocation and more flexible memory management.
To use dynamic memory allocation in C++, we need to use pointers and the new and delete operators. Pointers are variables that store the address of another variable or object in memory. The new operator allocates a block of memory from the heap (a pool of free memory) and returns a pointer to it. The delete operator frees the memory allocated by new and returns it to the heap.
For example, to create an integer variable dynamically, we can write:
int *i = new int; // allocate 4 bytes of memory from the heap and store its address in i
*i = 10; // assign 10 to the memory pointed by i
cout << *i << endl; // print the value of the memory pointed by i
delete i; // free the memory pointed by i and return it to the heap
Similarly, to create an array of characters dynamically, we can write:
char *name;
name = new char[100]; // allocate 100 bytes of memory from the heap and store its address in name
strcpy(name, "John"); // copy "John" to the memory pointed by name
cout << name << endl; // print the value of the memory pointed by name
delete[] name; // free the memory pointed by name and return it to the heap
Note that we need to use delete[] for arrays, not delete.
Dynamic memory allocation for objects
To create an object dynamically, we can use the same syntax as for variables, but with the class name instead of the type name. For example, if we have a class called Hero, we can write:
Hero *h = new Hero; // allocate enough memory for a Hero object from the heap and store its address in h
This will also call the default constructor of the Hero class, which initializes the object's attributes. To access or modify the object's attributes or methods, we can use either the dereference operator (*) or the arrow operator (->). For example:
Hero *b = new Hero; // create a Hero object dynamically
b->setLevel('A'); // call the setLevel method on b using ->
b->setHealth(70); // call the setHealth method on b using ->
cout << "level is " << (*b).level << endl; // access the level attribute of b using *
cout << " health is " << (*b).getHealth() << endl; // call the getHealth method on b using *

// OR

cout << "level is " << b->level << endl; // access the level attribute of b using ->
cout << " health is " << b->getHealth() << endl; // call the getHealth method on b using ->
Note that both *b and b-> refer to the same object, so they are interchangeable.
Smart pointers
Smart pointers are classes that wrap raw pointers and provide automatic memory management. Smart pointers are defined in the <memory> header file and include three types: unique_ptr, shared_ptr, and weak_ptr. For example, to create a smart pointer of type unique_ptr, we can write:
unique_ptr<int> p(new int); // create a unique_ptr that points to a dynamically allocated int
*p = 20; // assign 20 to the memory pointed by p
cout << *p << endl; // print the value of the memory pointed by p
// no need to delete p, it will be deleted automatically when it goes out of scope
Smart pointers have some advantages over raw pointers, such as:
They prevent memory leaks by automatically deleting the memory they point to when they are no longer needed.
They avoid dangling pointers by preventing copying or assigning of
unique_ptrs and allowing only oneshared_ptrto own the memory at a time.They provide convenient access to the memory they point to using operators and methods.
Initialization List in C++
In C++, an initialization list is a powerful syntax construct used in the constructor of a class to initialize member variables. It allows you to initialize member variables directly when they are created, before the body of the constructor executes. By leveraging initialization lists, you can enhance the efficiency and flexibility of your code.
Syntax and Usage
The syntax for using an initialization list in a constructor is straightforward. After the constructor's parameter list, you add a colon (:) followed by a comma-separated list of member variable initializations. Here's an example to illustrate its usage:
class MyClass {
private:
    int x;
    double y;
public:
    MyClass(int a, double b) : x(a), y(b) {
        // Constructor body
    }
};
In the above code, x and y are initialized using the initialization list. The syntax x(a) initializes the member variable x with the value of the constructor parameter a, and y(b) initializes y with the value of b.
Advantages of Initialization Lists
Initialization lists offer several advantages over assigning values to member variables within the constructor body:
1. Efficiency
Initialization lists can improve the efficiency of your code. When you assign values in the constructor body, the member variables are first default-constructed, and then their values are reassigned. With initialization lists, the member variables are constructed directly with the specified values, eliminating the need for an extra assignment step. This direct initialization can result in performance improvements, especially for complex objects.
2. Const Member Variables
If your class has const member variables or references, they must be initialized at the point of their creation and cannot be reassigned later. Since the constructor body is executed after the member variables are default-constructed, you cannot assign a value to a const variable or bind a reference within the constructor body. Therefore, initialization lists provide a way to directly initialize const member variables and references when the object is constructed.
3. Initialization of Base Classes
If your class inherits from a base class, you can use the initialization list to initialize the base class's constructor. This ensures that the base class is properly initialized before the derived class's constructor body is executed. By explicitly specifying the base class constructor in the initialization list, you have fine-grained control over the initialization process.
4. Initialization of Member Objects
If your class has member objects that require initialization, you can use the initialization list to specify their initial values. This is particularly useful when the member objects do not have default constructors or require complex initialization logic. By providing the necessary arguments in the initialization list, you ensure that the member objects are constructed correctly from the beginning.
Advanced Usages
Apart from the core advantages, initialization lists enable some advanced use cases:
1. Initialization of Member Objects Without Default Constructors
In situations where a class member object does not have a default constructor, you must use an initialization list to initialize it. By specifying the appropriate arguments in the initialization list, you can ensure that the member object is correctly constructed.
2. Handling Constructor Parameter Name Conflicts
When the constructor's parameter name conflicts with a data member's name, initialization lists are necessary. In such cases, you can use the this pointer or the initialization list itself to differentiate between the parameter and the member variable, ensuring correct initialization.
3. Performance Optimization
Initialization lists can contribute to performance optimization. By initializing all class variables in the initialization list rather than assigning values inside the constructor body, you can reduce function calls. This is particularly beneficial when working with complex objects, as it avoids unnecessary default construction and assignment operations.
Delegating constructors
A delegating constructor is a constructor that calls another constructor of the same class to perform some common initialization tasks. It can be useful to avoid code duplication and improve readability. To delegate to another constructor, you need to use its name and arguments in the initialization list. For example:
class Point { int x; int y;
public:
    Point() : Point(0, 0) {} // delegating constructor
    Point(int a, int b) : x(a), y(b) {} // target constructor
};
In this example, the default constructor delegates to the parameterized constructor with arguments 0 and 0, which initializes x and y accordingly.
Brace initialization
- Brace initialization: Brace initialization is a way of initializing objects or variables using curly braces {}. It can be used for any type of object or variable, including arrays, vectors, maps, etc. It can also be used to initialize data members of a class or a structure using an initialization list. For example:
Point p1 {10, 20}; // brace initialization
Point p2 = {30, 40}; // brace initialization
int arr[] = {1, 2, 3}; // brace initialization
std::vector v = {4, 5, 6}; // brace initialization
In these examples, p1 and p2 are initialized with brace initialization using an initialization list. arr and v are initialized with brace initialization using an array initializer and a vector initializer, respectively.
Brace initialization has some advantages over other forms of initialization, such as:
- It prevents narrowing conversions, which means that you cannot initialize an object or variable with a value that does not fit in its type. For example:
int x {3.14}; // error: narrowing conversion
char c {'hello'}; // error: narrowing conversion
- It allows you to omit the equal sign (=) when initializing an object or variable with braces. For example:
Point p {10, 20}; // OK
Point q = {30, 40}; // OK
- It can be used to initialize aggregate types (such as arrays or structures) without specifying their type names. For example:
auto arr = {1, 2, 3}; // OK
auto p = {10, 20}; // OK
Conclusion
Congratulations on reaching the end of this comprehensive blog on essential topics in object-oriented programming in C++. You have covered important concepts such as OOP principles, encapsulation, inheritance, polymorphism, abstraction, padding and alignment, dynamic memory allocation and so much more!!
By understanding these concepts and their practical applications, you are well-prepared to tackle interviews and excel in your programming journey. Remember to practice writing code, as hands-on experience is crucial for mastering these concepts.
Best of luck with your future interviews and coding endeavors. May you ace your interviews and achieve great success in your career as a skilled C++ programmer!!


